
Hi there, this post is about one of the important and general features of Django and you guessed it right. Yeah, it’s about the Django Class Based Views (Generic Views) and its usage to implement the ListView and DetailsView on a model of data. Now, you might be wondering what acutally do I mean when I say Generic Views, Django Class Based Views, ListView and Detail View and all stuff. Hold your curiosity. I am gonna walk you through all these concepts.
These days, most of the websites follow a pattern in which one page shows a list of things and the other page shows the details of the thing selected on the previous page. For example, consider this very blog, simplifiedpython.net. As you visit it, you are welcomed with a list of posts which is called ListView and as you click on any post, another page shows up giving the details of the post which is called DetailView. Now, you might think that now I know what listview and detailsview are but how do I implement them. This is exactly where generic views comes into play and simplifies things.
Generic Views are basically class based views. These are usually used for the implementation of ListView and DetailView. These have inbuilt functionality and methods to simplify achieving the same. So now that you know the stuff, let’s start coding with generic views:-
As an example to learn generic views, we will be creating a webapp which would do the following:-
- It shall display a list of watches for sale.@http://127.0.0.1:8000/genericviews/
- When clicked on any product, it shall show the details of the selected product.
- It shall accept new watch details i.e. the title and description of the watch.@http://127.0.0.1:8000/genericviews/makeentry and save them into the db to be later shown in the listview.
Django Class Based Views Example
Creating a new Django Project
- Run your Windows PowerShell in Administrator Mode and run the following command to navigate into the desktop directory :
|
1 2 3 |
cd ~/Desktop |
- Run the command below to start a project new django project:
|
1 2 3 |
django-admin startproject website |
- As you do, you will see a folder on your desktop containing the django files named website
- Open the folder in any Django IDE or any text editor will work fine.
- Run the command below to change the directory of PowerShell to the folder “website”:
|
1 2 3 |
cd website |
Creating a new App inside the Project
- Run the command below to start a new app into your project.
|
1 2 3 |
python manage.py startapp genericviews |
- Here, genericviews is the name of your app. As your run the above command, a folder named users will show up in the website folder.
Coding the App
Creating Model
- In the app folder genericviews, there’s a file called models.py. To configure the database, we need a model of the data we will be dealing with. To do so, add the following code to the models.py python file.
|
1 2 3 4 5 6 7 8 9 10 11 12 13 14 15 |
from django.db import models # Create your models here. class Product(models.Model): # title of the watch title = models.CharField(max_length=100) # description of the watch desc = models.CharField(max_length=300) def __str__(self): return self.title |
Registering Model
- Now we need to register the above model into the admin.py file in the users folder. To do so, add the following code to the admin.py file present in users folder.
|
1 2 3 4 5 6 7 8 |
from django.contrib import admin # Register your models here. from genericviews.models import Product admin.site.register(Product) |
- By now, the model of the database is ready. But we need to implement this database into the SQLite db. To do so, open the Windows PowerShell and the follow the commands given below.
Making Migrations
- Make sure that the shell is navigated into the website folder and run the following command.
|
1 2 3 |
python manage.py makemigrations genericviews |
- Next, run the command below to actually implement it into the database.
|
1 2 3 |
python manage.py migrate |
- By now, the database is created into the sqlite db.
Building the Form
- In the app folder genericviews, create a new python file called forms.py. To configure the form through which the input is to be taken, code this file forms.py with the code below.
|
1 2 3 4 5 6 7 8 9 10 11 |
from django import forms class ProductForm(forms.Form): # variable for the title of the product title = forms.CharField(label="Title", max_length=100) # variable for the description of the product desc = forms.CharField(label="Description", max_length=300, help_text="Write a brief of the product.",widget=forms.Textarea) |
- Until now, you went through lot of things in the above instructions and you must be wondering that where the heck is generic views. Well, your wait is over. Next, we need to configure the views.py file in the genericviews app folder where we would actually see generic view being used. So, go ahead and add the code below to the views.py file:-
|
1 2 3 4 5 6 7 8 9 10 11 12 13 14 15 16 17 18 19 20 21 22 23 24 25 26 27 28 29 30 31 32 33 34 35 36 37 38 39 40 41 42 43 44 45 46 |
from django.shortcuts import render # Create your views here. from django.views import generic from genericviews.forms import ProductForm from genericviews.models import Product # normal view to handle the entry of the product and store it on the database def makeentry(request): if request.method == 'POST': form = ProductForm(request.POST) if form.is_valid(): title = request.POST.get('title', '') desc = request.POST.get('desc', '') product = Product(title=title, desc=desc) product.save() form = ProductForm() return render(request, 'genericviews/makeentry.html', {'form': form}) else: form = ProductForm() return render(request, 'genericviews/makeentry.html', {'form': form}) # generic view to fetch the data then show in a list class IndexView(generic.ListView): # a name to refer to the object_list(to be used in the index.html) context_object_name = 'product_list' template_name = 'genericviews/index.html' def get_queryset(self): return Product.objects.all() # generic view to show the details of a particular object class DetailsView(generic.DetailView): model = Product template_name = 'genericviews/detail.html' |
Making URL Pattern for Form
- Next, in the app folder called genericviews, create a new python file named ‘urls.py’ and add the code below:-
|
1 2 3 4 5 6 7 8 9 10 11 12 13 14 |
from django.conf.urls import url from genericviews import views app_name = 'genericviews' urlpatterns = [ url(r'^$', views.IndexView.as_view(), name='index'), url(r'^(?P<pk>[0-9]+)/$', views.DetailsView.as_view(), name='detail'), url(r'^makeentry$', views.makeentry, name='makeentry'), ] |
- By now, we are all done with the backend of this app.
Creating UI for Django generic Views (class based views) example
- Firstly create a directory named templates into the folder genericviews.
- Now, in the templates folder, create another directory named genericviews and it should be like /genericviews/template/genericviews.
- In the genericviews folder present in templates directory, create a new HTML file called makeentry.html and add the following code, it contains the UI used to take input.
|
1 2 3 4 5 6 7 8 9 10 11 12 13 14 15 16 17 18 19 |
<!DOCTYPE html> <html lang="en"> <head> <meta charset="UTF-8"> <title>Product Entry</title> </head> <body> <form action="{% url 'genericviews:makeentry' %}" method="post"> {% csrf_token %} {{ form }} <input type="submit" value="Submit"> </form> </body> </html> |
- In the same directory, create another html file named index.html and add the code below .This will act as a home page and display the list of watches.
|
1 2 3 4 5 6 7 8 9 10 11 12 13 14 15 |
{% if product_list %} <h1>Buy Wrist Watches! </h1> <ul> {% for product in product_list %} <li> <a href="{% url 'genericviews:detail' product.id %}">{{ product.title }}</a> </li> {% endfor %} </ul> {# In case no product exists. #} {% else %} <h3> No product found.</h3> {% endif %} |
- In the same directory, create one last html file named detail.html and add the code below .This will act as a second page and display the detail of the selected watch:-
|
1 2 3 4 |
<h1>{{ product.title }}</h1> <h3>{{ product.desc}}</h3> |
Finalizing project
- In the folder website, there’s file called urls.py. Update that file with code given below:-
|
1 2 3 4 5 6 7 8 9 10 |
urlpatterns = [ url(r'^admin/', admin.site.urls), url(r'^genericviews/', include('genericviews.urls')), ] |
- Finally in the folder website , there’s another file called settings.py. We need to register the app ‘genericviews‘ into the installed apps category in this file settings.py. To do so, look for the INSTALLED APPS category in settings.py and then register the app as show below :-
|
1 2 3 4 5 6 7 8 9 10 11 |
INSTALLED_APPS = [ 'genericviews.apps.GenericviewsConfig', 'django.contrib.admin', 'django.contrib.auth', 'django.contrib.contenttypes', 'django.contrib.sessions', 'django.contrib.messages', 'django.contrib.staticfiles', ] |
That’all. We’re done with coding the app.
Running the App
- Now lets try running the app make sure your development server is running. If not you can use the following command into your Windows PowerShell to run your development server.
|
1 2 3 |
python manage.py runserver |
Django Class Based Views (Generic Views) Example
- Now go to the url http://127.0.0.1:8000/genericviews/makeentry to see your product form to make an entry:-
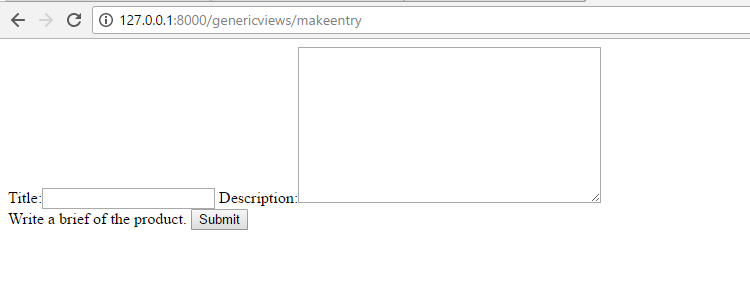
- Make 3-4 entries in the form shown above. It shall be stored on the database as you hit submit .
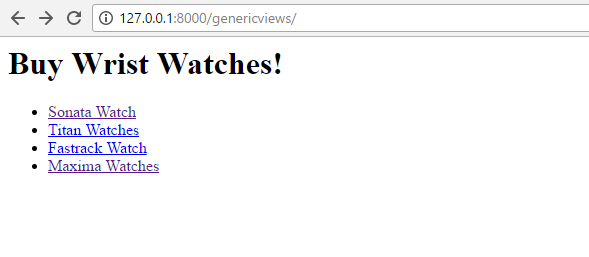
- Now that we have the data of certain products into our database, we are good to see the listview showing the list of watches.
- So, Go to the url:-http://127.0.0.1:8000/genericviews/ and you shall a list of watches as shown in the image below:-
- Now, if you click on any of the watches, it shall take you the details section as you had entered it.

- Now if you are still having troubles implement Django Class Based Views then you can get my source code from below.
[sociallocker] Django Class Based Views Source Code [/sociallocker]
So thats all for this Django Class Based Views Tutorial. You can leave your comments below to have a discussion about the queries and confusions. Thank You 🙂
Your articles are good but the thing is that you always forgot to mention that whenever you are going to do “migrations”
then before doing that, that particular app must be present in the “INSTALLED_APPS”. And i am mentioning this because you have not mentioned this in not even a single example on your website.
You can take example of this post, user cannot able to do/performs migrations of a model related to an app withour registering/installing that app to the main “settings.py” file under the section “INSTALLED_APPS”.
thankyou
Doesn’t show anything in the DetailsView when I use product. But using object works perfectly fine. I’m using Django 1.10. Maybe it depends on the version?
But thanks anyway, finally I found a working tutorial for forms :)!!!
Its a very great article. I just had one doubt: How do we customize the way in which we want the form input elements to be displayed in the makeentry page. Like suppose if I have to add CSS to it, then how should I do it to those form input elements.