Hello friends, in last Django tutorial we learnt about Handling HTML Forms in Django. Today we will learn about Django Database API. The best thing is Django Database API is you do not need to write SQL statements, Django will do it for you. Pretty Amazing Right? So let’s see what Django Database API and Database Models are.
So let’s start our Django Database API Tutorial. We will start from creating a new Django Project.
Django Database API Tutorial
Creating a Django Project
- Again run the command django-admin startproject YourDjangoApp. (In command prompt or PowerShell, remember to navigate to the directory first where you want to save your project.)
- We will now create an app inside your project.
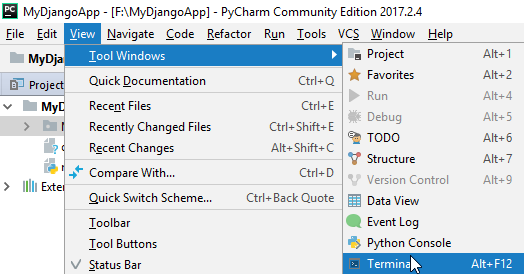
- We can use the inbuilt terminal of PyCharm to execute commands. To open terminal go to View -> Tool Windows -> Terminal (or simply press alt + F12)
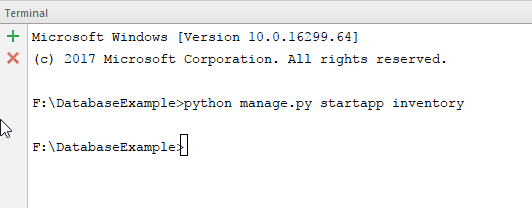
- On your terminal execute the command python manage.py startapp <yourappname> to create a new app. In below screenshot you can see I have created an app named Inventory.
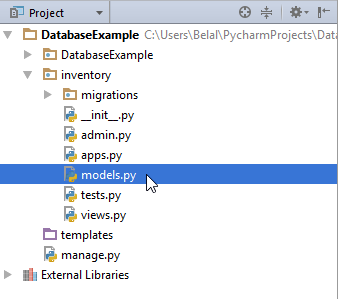
- After running the above command you will see a new folder named inventory in your project.
Creating Models
Models in Django is basically blueprint of your database table. And it is the coolest thing as when we are using models, we do not need to create any database table. Each model in our Django maps to the table. And every variable in our Model is a column in the table.
In this tutorial I will create two Models Categories and Products. Both models (tables) will be connected by using Primary and Foreign Key. I hope you already know about Primary and Foreign Keys.
Now follow these steps to make your models.
- Come inside models.py inside your app directory. (See the screenshot for help).
- Write the following code inside models.py file of your app directory.
|
1 2 3 4 5 6 7 8 9 10 11 12 13 14 |
from django.db import models #Create your models here. class Category(models.Model): categoryName = models.CharField(max_length=100) class Product(models.Model): productCategory = models.ForeignKey(Category, on_delete=models.CASCADE) productName = models.CharField(max_length=100) productPrice = models.IntegerField() productBrand = models.CharField(max_length=100) |
What we did?
In the above code we have created two classes. First class is our model for Category table. The second class is model for Product table. Both tables are connected with primary key and foreign key. Actually whenever we create a model Django creates a column id automatically which is Primary Key. It is a cool thing that we do not need to create tables by running SQL statements, all these things are done by Django.
So finally we have
- A model Category, it has a variable categoryName, which is a CharField (that means we can store characters in it). Other than this Django will create a variable named id in this model, and the id will be an Auto Increment Integer. And this id will be the Primary Key for our table.
- A model Product, it has the following variables.
productCategory -> To store the category id, and it is foreign key.
productName -> To store name of product.
productPrice -> To store price of product.
productBrand -> To store price of product.
Activating our Model
We have created our models, now we need to activate it. As currently it is only in code format and the database is not created yet. To complete the table creation in database we need to activate the models we created. Follow these steps to activate your models.
- Go inside your project’s settings.py file.
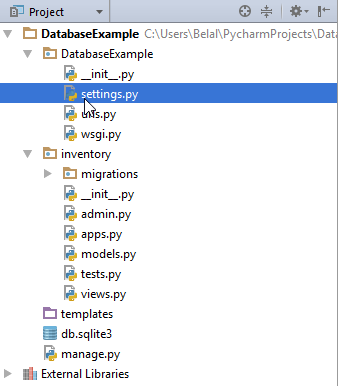
- In this file you will see INSTALLED_APPS, it contains the package of all the apps installed. We need to define our inventory app here. So modify your code as follows.
|
1 2 3 4 5 6 7 8 9 10 11 12 |
INSTALLED_APPS = [ #defining our app here 'inventory.apps.InventoryConfig', 'django.contrib.admin', 'django.contrib.auth', 'django.contrib.contenttypes', 'django.contrib.sessions', 'django.contrib.messages', 'django.contrib.staticfiles', ] |
- After doing this run your project. And then open terminal (alt + F12) and run the following command
|
1 2 3 4 |
python manage.py makemigrations inventory python manage.py migrate |
- On executing the above command your models will be migrated to your database.
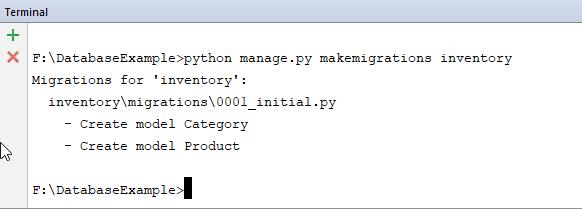
- Don’t forget to run the next command python manage.py migrate. Or your tables will not be created in the database.
Django Database API
Now we will use the Django Database API to store data. We will not create any form or views, in this tutorial we will do everything on the terminal. So go inside your terminal and follow these steps.
- Run the following command to enter Django Database API using python shell.
|
1 2 3 |
python manage.py shell |
- The above command will take you to Django Database API.

- Now to fetch all the records from the Category Table, we can use the following code. It is same as we write in python.

- As you can see the QuerySet returned is empty, because we have not added any data.
Storing Data using Django Database API
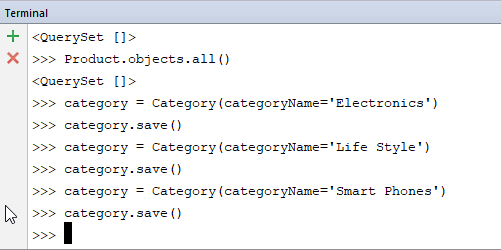
Now we will store some data. To store data using models we will create objects of our models, and then we will call the save function.
- See the following screenshot to know how to save data using objects.
- Now if we will try fetching the stored data then we will get.
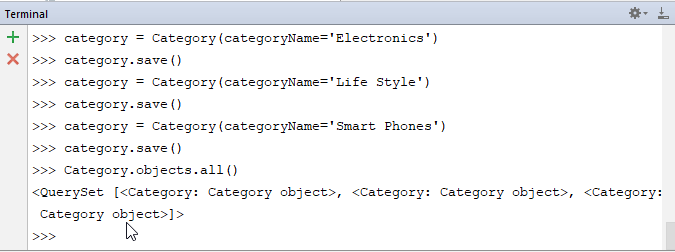
- As you can see in the result, we have only Category object. If you want to look at the actual results, then we need to tweak our model code a little.
Filtering Database Results
- Come inside models.py file of your app and modify the code as follows.
|
1 2 3 4 5 6 7 8 9 10 11 12 13 14 15 16 17 18 |
from django.db import models #Create your models here. class Category(models.Model): categoryName = models.CharField(max_length=100) #defining a method to return the category name def __str__(self): return self.categoryName class Product(models.Model): productCategory = models.ForeignKey(Category, on_delete=models.CASCADE) productName = models.CharField(max_length=100) productPrice = models.IntegerField() productBrand = models.CharField(max_length=100) |
- Now restart your Django Database API shell in the terminal and try fetching the categories.

- So now you can see the category names that we stored. You can also filter the data using the filter method with the primary key.

- You also download the source code from the below-given link.
Django Database API (1497 downloads)
So that’s all for this Django Database API tutorial friends. In the next tutorial, we will insert data using HTML forms. And feel free to leave your comment if having any confusions. Thank You 🙂

