
Uploading files in web development is one of the key functionalities without which web developers can’t really digest their website. This functionality is used in various fields in their own unique ways. It could be used for simple user registration which involves uploading images as an avatar, for uploading videos as on youtube, for uploading favourite songs as on saavn and the list goes on. As a conclusion, we can say that it is immensely important for one to learn the uploading of files in order to be a good Django web developer. So here is the post explaining Django File Upload using FileField.
More specifically, in this example of Django File Upload, we’ll be doing a user registration webapp containing just two links which will be as follows
- Since we just need to focus on upload of file, as an registration process, we’ll take input of user’s name and his/her profile picture which would be uploaded on the local server.
- Later the url of uploaded profile picture would be used to show the list of user with each user containing his/her name and profile picture.
Okay, here is the link description:-
- The first link would be where the user would input his/her name and profile picture.
- The second link would be where the list of registered users would be shown.
Now that you are aquainted with the aim of this Django File Upload example, let’s get started with code.
To accomplish the task of taking inputs in this example, ModelForms have been used which reduce the pain of defining forms. Don’t worry if you are not familiar with ModelForms. Just go through the post on Modelforms for which the link has been given below.
Django File Upload Tutorial
Creating a new Project
- Run your Windows PowerShell in Administrator Mode and run the following command to navigate into the desktop directory :
|
1 2 3 |
cd ~/Desktop |
- Run the command below to start a project new django project:
|
1 2 3 |
django-admin startproject website |
- As you do, you will see a folder on your desktop containing the django files named website
- Open the folder in any Django IDE or any text editor will work fine.
- Run the command below to change the directory of PowerShell to the folder “website”:
|
1 2 3 |
cd website |
Creating a new App inside the Project
- Run the command below to start a new app into your project.
|
1 2 3 |
python manage.py startapp uploadfileapp |
- Here, uploadfileapp is the name of your app. As your run the above command, a folder named uploadfileapp will show up in the website folder.
Coding the App
Creating Model
- We need to create a model of the data which we are going to work upon i.e. the name and avatar of the user.
- To do so, look for the file models.py in your app folder and add the code below:-
|
1 2 3 4 5 6 7 8 9 10 11 12 13 14 15 16 17 18 |
from django.db import models # Create your models here. from django.urls import reverse class User(models.Model): #the variable to take the inputs user_name = models.CharField(max_length=100) user_avatar = models.FileField() # on submit click on the user entry page, it redirects to the url below. def get_absolute_url(self): return reverse('uploadfileapp:home') |
- The function get_absolute_url in the above code simply returns the url to which the the user entry page is forwaded once the submit button is hit. In this case, it will return to the home page after the user entry adding the currently registered user to the list.
- To generate the form, model forms simply access the the models.py. The names of the parameters here become the respective labels in the form followed by a input box.
Registering Model
- Now we need to register the above model into the admin.py file in the users folder. To do so, add the following code to the admin.py file present in your app folder.
|
1 2 3 4 5 6 7 8 |
from django.contrib import admin # Register your models here. from uploadfileapp.models import User admin.site.register(User) |
- By now, the model of the database is ready. But we need to implement this database into the SQLite db. Doing so the SQLite db will create its own model of the same dataset. To do so, open the Windows PowerShell and the follow the commands given below.
Making Migrations
- Make sure that the shell is navigated into the website folder and run the following command.
|
1 2 3 |
python manage.py makemigrations uploadfileapp |
- Next, run the command below to actually implement it into the database.
|
1 2 3 |
python manage.py migrate |
- By now, the database is created into the sqlite db.
Configuring the Views
- This is where modelforms play an important role in form related tasks and data handling.
- No request handling for forms and no data is to be manually saved into the database as we work with modelforms.
Hence, look for the file views.py in your app folder and then add the following code:-
|
1 2 3 4 5 6 7 8 9 10 11 12 13 14 15 16 17 18 19 20 21 22 23 24 |
from django.shortcuts import render # Create your views here. from django.views import generic from django.views.generic import CreateView from uploadfileapp.models import User class HomeView(generic.ListView): # name of the object to be used in the index.html context_object_name = 'user_list' template_name = 'uploadfileapp/home_page.html' def get_queryset(self): return User.objects.all() # view for the user entry page class UserEntry(CreateView): model = User fields = ['user_name', 'user_avatar'] |
- In the above file views.py, the class HomeView generates the list of all the registered user in the form of an arraylist named user_list which is later used in the html files to display the existing users’ data. Also, the html file to be rendered with this view is mentioned here in the same.
- Similarly, in the class UserEntry, the fields have been mentioned according to which the form is to be created.
That was all we had to do the backend. Now, we gotta take care of the front end.i.e the HTML and the CSS.
Building UI for the app
- To do so, firstly create a directory named templates into the folder uploadfileapp.
- Now, in the templates folder, create another directory named uploadfileapp and it should be like /uploadfileapp/templates/uploadfileapp/.
- In the uploadfileapp folder present in templates directory, create a new HTML file called user_form.html and add the following code:-
|
1 2 3 4 5 6 7 8 9 10 11 12 13 14 15 16 17 18 19 20 21 22 23 24 25 26 27 28 29 30 31 32 33 34 35 36 37 38 39 40 41 42 43 44 45 46 47 48 49 50 51 52 53 54 |
<html> <head> </head> <style> body{ background-color: #2b542c; } h1{ color: white; background-color:#4cae4c; width: 100%; float:left; height: 50px; } button{ width: auto; height: 40px; text-align: center; background-color: #1b6d85; color: #ffffff; font-size: 30px; margin-top: 20px; } </style> <body > <h1>Add a new User</h1> {% if error_message %} <p><strong>{{ error_message }}</strong></p> {% endif %} <form action="" method="post" enctype="multipart/form-data"> {% csrf_token %} {% include 'uploadfileapp/form-template.html' %} <div class="form-group"> <div class="col-sm-offset-2 col-sm-10"> <button type="submit" class="btn btn-success">Submit</button> </div> </div> </form> </body> </html> |
- The above html generates the input panel for the user’s name and avatar.
- Now, in the same folder, create another html file named home_page.html and add the following code:-
|
1 2 3 4 5 6 7 8 9 10 11 12 13 14 15 16 17 18 19 20 21 22 23 24 25 26 27 28 29 30 31 32 33 34 35 36 37 38 39 40 41 42 43 44 45 46 47 48 49 50 51 52 53 54 55 56 57 58 59 60 61 62 63 64 65 66 67 68 69 70 71 72 73 74 75 76 77 78 |
<html> <head> <title class="title" > </title> <style> body{ background-color: #2b542c; } h1{ color: white; background-color:#4cae4c; width: 100%; float:left; height: 50px; } button{ width: auto; height: 60px; text-align: center; background-color: #1b6d85; color: #ffffff; font-size: 35px; } img{ width: 200px; height: 150px; } </style> </head> <body > <h1> UploadFileApp Users</h1> {% if user_list %} {% for user in user_list %} <ul> <li> <h2>{{ user.user_name }}</h2> <img src="{{ user.user_avatar.url }}" > </li> </ul> {% endfor %} {% else %} <h1 class="textNoUsersfound" >No users found.</h1> {% endif %} <form action="{% url 'uploadfileapp:user-entry' %}" method="post" style="display: inline;" > {% csrf_token %} <button type="submit">Add a new User</button> </form> </body> </html> |
- The above html code displays the list of registered users.
- In the same directory, create one last html file named form-template.html and add the code below .This will serve as a base template for each field in the form. You can see this included in the html of the file user_form.html:-
|
1 2 3 4 5 6 7 8 |
{% for field in form %} <div class="form-group"> <label style="font-size: 20px;color: white; " >{{ field.label_tag }}</label> <div class="input" >{{ field }}</div> </div> {% endfor %} |
Setting Up Bootstrap
In this example, we also made use of some of the classes of bootstrap. So to use bootstrap in this project, follow the steps given below:-
- Go to the link given below and download bootstrap.css file.
- In your app folder, create a folder named static. Next in static folder, create another folder by the name of this webapp i.e. uploadfileapp and add the downloaded bootstrapp.css file into the same.
And your bootstrap is all set.
- We’re almost done. The UI and backend both are ready. We just need to link the broken ends by configuring the urls. To do so, create a file named urls.py in your app folder and add the code below:-
|
1 2 3 4 5 6 7 8 9 10 11 12 13 14 15 16 17 18 |
# /uploadfileapp/ from django.conf.urls import url from uploadfileapp import views app_name = 'uploadfileapp' urlpatterns = [ # uploadfileapp/ url(r'^$', views.HomeView.as_view(),name='home' ), # uploadifileapp/register url(r'^register/$', views.UserEntry.as_view(), name='user-entry'), ] |
- Follow the comments to understand the url patterns in the above code.
Finalizing project-
- In the folder website, there’s a file called settings.py. Hop over to the bottom of this file until you spot the line “
|
1 2 3 |
STATIC_URL = '/static/' |
- Now below the line, add another set of lines as shown below:-
|
1 2 3 4 5 6 7 8 9 |
STATIC_URL = '/static/' MEDIA_ROOT = os.path.join(BASE_DIR,'media')#this line is added and it serves as the root address of #uploaded file MEDIA_URL = '/media/'#this line is added and it creates a directory named media in your appfolder #where the uploaded images will be stored |
- In the same folder website, look for the url file called urls.py and add the following code:-
|
1 2 3 4 5 6 7 8 9 10 11 12 13 14 15 16 17 |
from django.conf.urls import url, include from django.contrib import admin from django.conf import settings from django.conf.urls.static import static urlpatterns = [ url(r'^uploadfileapp/', include('uploadfileapp.urls')), ] # if the DEBUG is on in settings, then append the urlpatterns as below if settings.DEBUG: urlpatterns += static(settings.STATIC_URL, document_root=settings.STATIC_ROOT) urlpatterns += static(settings.MEDIA_URL, document_root=settings.MEDIA_ROOT) |
- Finally, mention your app into the INSTALLED APPS category in the file settings.py in your website folder as shown below:-
|
1 2 3 4 5 6 7 8 9 10 11 |
INSTALLED_APPS = [ 'uploadfileapp.apps.UploadfileappConfig', 'django.contrib.admin', 'django.contrib.auth', 'django.contrib.contenttypes', 'django.contrib.sessions', 'django.contrib.messages', 'django.contrib.staticfiles', ] |
- Thats’ all. We are done coding the app.
- And your uploadfileapp is all set to undergo a test run.
Running the App
- Now lets try running the app. Make sure your development server is running. If not you can use the following command in your Windows PowerShell to run your development server.
|
1 2 3 |
python manage.py runserver |
Django Upload File Example
- Now go to the url http://127.0.0.1:8000/uploadfileapp/ to see your list of user entries:-
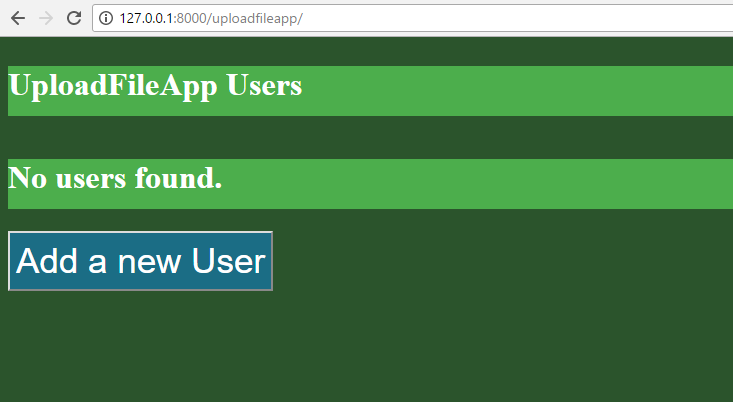
- Certainly, it was supposed to give the message saying no user found as no entries yet exist.
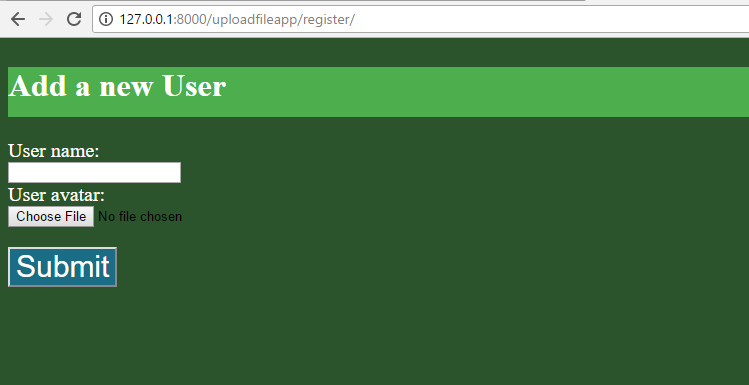
- Now, if we click on “Add a new User ” button, its gonna take us to the url given below:-
- http://127.0.0.1:8000/uploadfileapp/register/
- Once you make an entry, it’ll take you to the homepage showing the list of registered user as shown below:-
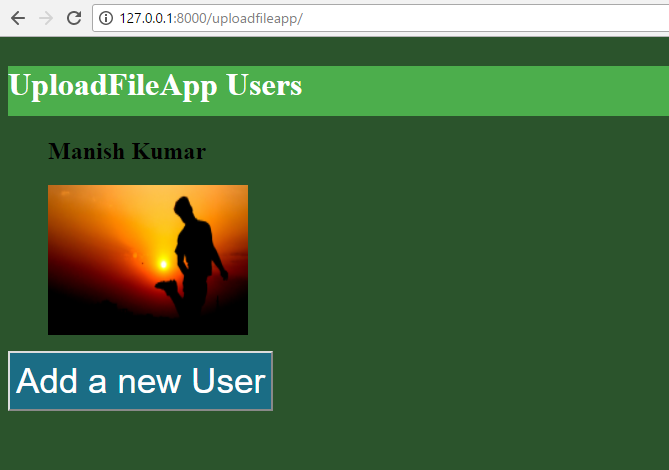
- Bingo! The webapp is working perfectly.
- If you came across certain errors or dificulties in understading, let me know in the comments section.
So thats all for Django File Upload Tutorial friends. Stay tuned and I will post more useful tutorials that will help you in learning Web Development using Django. Meanwhile you can comment if you want a particular topic to be explained in the coming posts. Thank You 🙂
Thanks for this series of tutorials.
I just want to add that I’m using Django 1.11 and I’m not able to make migrations unless I first register the app in the INSTALLED_APPS settings.
Just in case anyone else is reading.
Hi,
I need the few more information regarding this ,
Which version of Python, Django, and Databases are used.
In CMD
—Python Version—
Python –version
—Django Version—
Django-admin –version
hyperlink bootstrap.min are unavailable, and how to download the bootstrap.min
this is run but not upload file this is not add in database please help for that
django.core.exceptions.FieldError: Unknown field(s) (user_avatar) specified for User
[15/Jul/2018 08:18:26] “POST /uploadfileapp/register/ HTTP/1.1” 500 104276
Performing system checks…
Getting erroe please help
Nice Tutorial…
How to add the OCR functionality to this Project using tesseract for Image to text?