

Hello everyone, in this post we will learn a very important module of python that is NumPy. NumPy is extremely popular python module in python community. It is heavily used in Scientific computing. So let’s start Python NumPy Tutorial .

In this post we will learn following concepts of NumPy :
- What is NumPy
- NumPy vs List
- Features of NumPy
- NumPy data types and many more
Python NumPy Tutorial – Learn NumPy With Examples
What Exactly Is NumPy ?
- NumPy is a high-performance multidimensional array library in python.
- It is primarily used for Numerical analysis.
- It is core library for scientific computing in python.
- The name is an acronym for “Numeric Python” or “Numerical Python”
Features Of NumPy
It has following features –
- A powerful N-dimensional array object
- Sophisticated (broadcasting) functions
- Tools for integrating C/C++ and Fortran code
- Useful linear algebra, Fourier transform, and random number capabilities
Why We Use NumPy
When we talk about arrays, we have different types of arrays. Example, the first one is single dimensional array and the second one is multidimensional arrays.
Single Dimensional array means, it have only one row and multiple columns. But what if you want to work with multidimensional array, which simply means you have an array which have multiple rows and multiple columns. Multidimensional arrays can be 2-dimensional, 3 dimensional or n-dimensional.
You can use multiple dimensional array for implementing matrix. Let’s say, if you are working on some scientific calculation, you have matrix there. So it is useful to working with multiple dimensional array.
So now the question arise, can we use multiple dimensional arrays in python. And answer is that obviously, python is one of the best language. But there is a case, if you talk about the array which are available in python for you, in that you can’t work with multi dimensional array unfortunately. Because even if you try for that, for example if you want to create a multi dimensional array with array module, you can’t do that, you will get error. Let’s see it practically, here i am creating a multiple dimensional array with array module.
|
1 2 3 4 5 6 7 |
from array import * arr = array('i',[1,2,3],[4,5,6]) print(arr) |
- If you run this code you will get following error
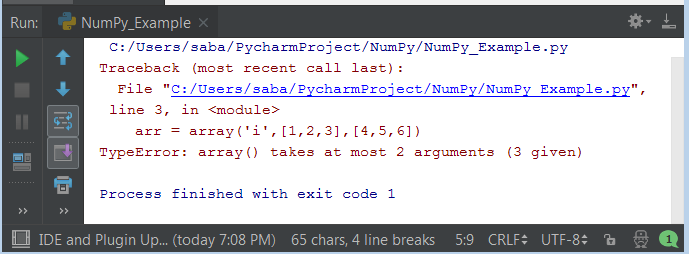
Now you can see you got an error here. So how can we work with multi dimensional array because in array module we don’t have that. So the package which are using here, which is array doesn’t support multi dimensional.
That’s why, we can use a third party package and that is your NumPy . Using NumPy package, we can create single dimensional as well as multi-dimensional arrays. By default NumPy package is not available in python, you have to install it manually. We will see installing NumPy package later.
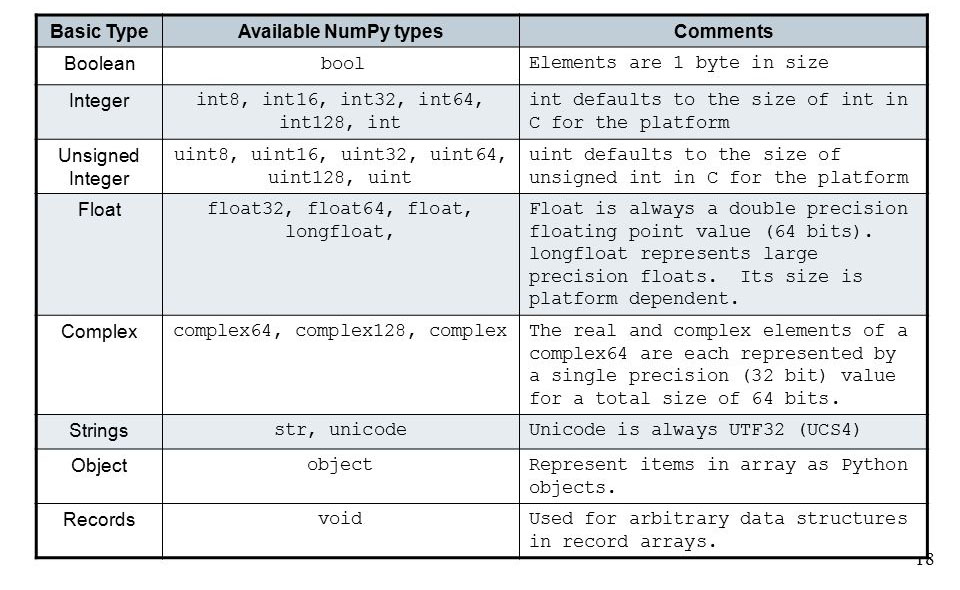
NumPy Data Types
Numerical Types :
- integers (int)
- unsigned integers (uint)
- floating point (float)
- complex
Other Data Types
- booleans (bool)
- string
- datetime
- python object
The below image shows a detailed overview of NumPy datatypes.
How To Create NumPy Array
Now we will see, how to create a NumPy array in python.
Importing NumPy Module
First of all you have to import NumPy module. For this run the following code on terminal.
|
1 2 3 |
pip install NumPy |
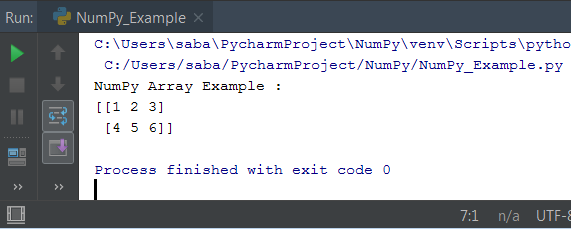
And now write the following code to create a NumPy array.
|
1 2 3 4 5 6 7 8 |
import numpy as np my_array = np.array([(1,2,3), (4,5,6)]) print("NumPy Array Example : ") print(my_array) |
- array() function is used to create NumPy array
So lets see the result of NumPy array.
Advantages Of NumPy Over List
So now a question arise, why we use NumPy instead of a list. So answer is here –
Save Coding Time :
- No for loops : many vector and matrix operations saves coding time.
Faster Execution :
- Single type for each field to avoid type checking.
- Uses contiguous blocks of memory.
Now i am going to prove practically that actually NumPy array is faster and more convenient than a list. So let me show you how this happen.
|
1 2 3 4 5 6 7 8 9 10 11 12 13 14 15 16 17 18 19 20 21 22 23 24 25 26 27 28 29 30 31 32 |
import numpy as np import time SIZE = 1000000 # create two lists L1 = range(SIZE) L2 = range(SIZE) # create two NumPy arrays A1 = np.arange(SIZE) A2 = np.arange(SIZE) start_list = time.time() # sum of two lists list_result = [(x,y) for x,y in zip(L1,L2)] # execution time of list print("List Execution : ", (time.time()-start_list)*1000) start_numpy = time.time() # sum of two NumPy arrays numpy_result = A1 + A2 # execution time of NumPy array # multiplied with 1000 because by default it is taken in second but we need to convert it in milisecond print("NumPy Execution : ", (time.time()-start_numpy)*1000) |
What We Did ?
- in this example, we have added two lists and two NumPy arrays and shown their execution time.
- To add two lists, you need to run a for loop because if you directly write L1+L2 , it is going to give a result which is nothing but concatenation of both the lists.
- But when we talk about array, what you need to do is, you need to just write A1+A2 that’s it.
- So it is more convenient to work with NumPy array instead of list.
And now see the result –
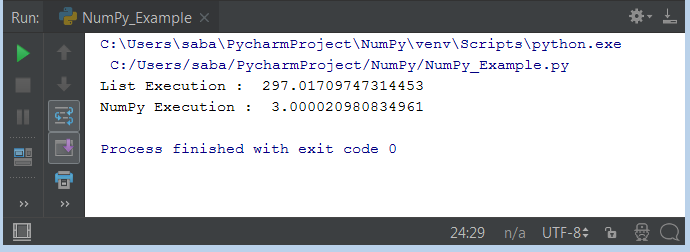
You can see that there is a huge difference between List and numPy execution. As a result NumPy is much faster than a List.
Uses Less Memory :
- Python List : an array of pointers to python objects, with 4B+ per pointer plus 16B+ for a numerical object.
- NumPy Array : No pointers ; type and itemsize is same for columns.
- Compact datatypes like uint8 and float16.
Now we will see it practically, so let’s start.
|
1 2 3 4 5 6 7 8 9 10 11 12 13 14 15 16 17 18 19 20 21 22 23 24 25 |
import numpy as np import sys # Define a list # it actually tell all the integer value 0-1000 and it will given to a variable my_list # so this list contain the integer values between 0-1000 # but it not include 1000, it include only till 999 my_list = range(1000) #memory occupied by the list # sys.getsizeof(4) will give size of single element in list # get the entire memory occupied by list by multiplying length of list print("Memory Taken By List :", sys.getsizeof(4)*len(my_list)) # arange() function is pretty much similar to range() numpy_array = np.arange(1000) # numpy_array.size actually give one single element # when it multiplied by length of NumPy array, the entire space occupied by array will be generated print("Memory Taken By NumPy array :", numpy_array.size*numpy_array.itemsize) |
So now let’s check the result –
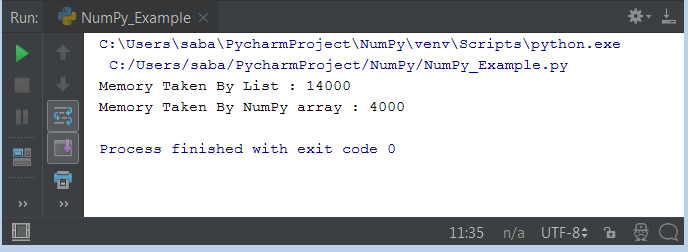
So you can see that there is quite lot of difference between them. And now it is proved that NumPy occupy less memory than list.
NumPy Array Pointers
- Data Type : All elements have same NumPy data type.
- Item Size : Memory size of each item in bytes
- Shape : Dimensions of the array
- Data : The easiest way to access the data is trough indexing , not this pointer.
Ways Of Creating Arrays In NumPy
So now we will discuss about various ways of creating arrays in NumPy. So basically we have 6 ways to creating arrays in NumPy, which are following –
- array()
- arange()
- linspace()
- logspace()
- zeros()
- ones()
Now we will learn each ways with examples.
array()
We can create NumPy array using array() in the following way.
|
1 2 3 4 5 6 7 8 |
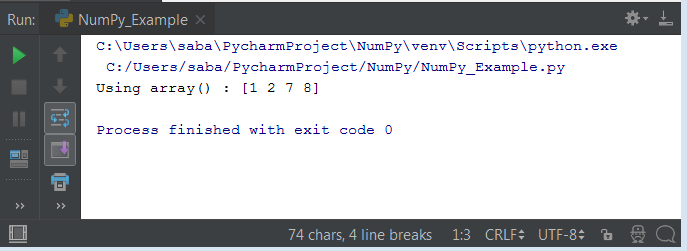
from numpy import * #create the array arr = array([1,2,7,8]) print("Using array() :", arr) #print the array |
- If you remember in a normal array package, we need to specify the type as well, but here we don’t need to do that. You can specify the type here but by default it will guess the value you are entering, and based on that it will convert .
- Let’s see the result –
arange()
The another way we have is arange().
|
1 2 3 4 5 6 7 8 |
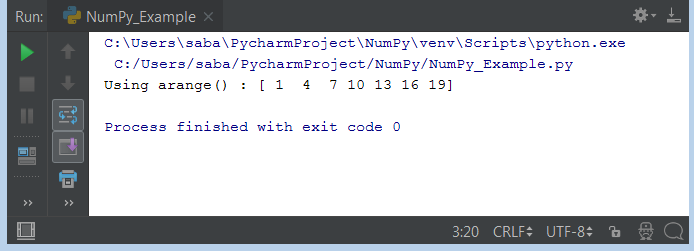
from numpy import * #create array arr = arange(1,20,3) print("Using arange() :", arr) |
- In arange() method, you have to mention the 1st element and last element and then you have to also mention the step.
- Here i have mention step as 3, so it will print 1 then skip two numbers then print 4 and so on.
- So let’s see the result of this way.
linspace()
- linspace() will take 3 parameters. That are Start , Stop and Retstep.
So the code for this is following.
|
1 2 3 4 5 6 7 8 9 |
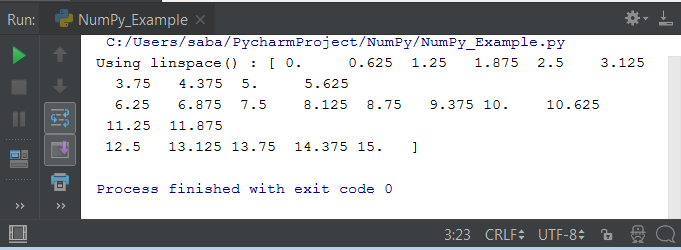
from numpy import * # create array # start=0, stop=15, retstep arr = linspace(0,15,16) print("Using linspace() :", arr) |
- linspace(0,15,16) will take the values from 0-15 and here retstep is 16 so it will break the values into 16 different parts.
- So if you run this code, you got the following output.
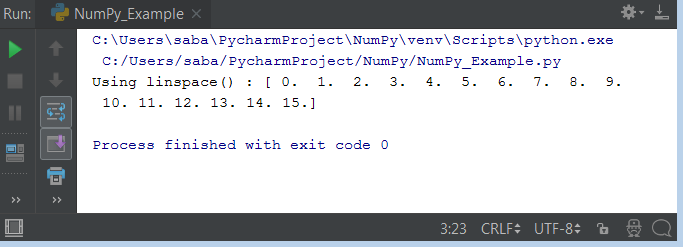
Now you might be thinking why dot(.) here. Because all the values here, they are float. Why float – because you are breaking the range into parts wise so this range is divided into 16 parts and normally you divide as the part you might get float value. This is awesome.
If you increase the retstep let’s say 25, then what will happen.
|
1 2 3 |
arr = linspace(0,15,25) |
So see the result, this will divide the numbers into 25 parts.
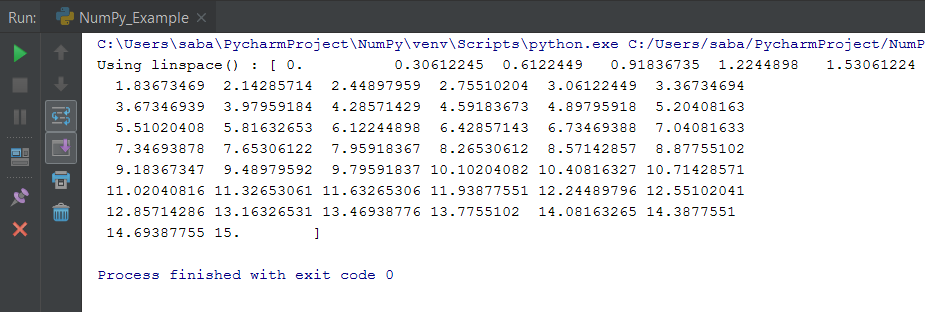
And now we will see, if you don’t specify the retstep then what will happen.
|
1 2 3 |
arr = linspace(0,15) |
It will divide the numbers into 50 parts which is by default. So lets see the result.
logspace()
- logspace() is an another way of creating array. So let’s see how it works.
- logspace() is different from linspace().
- In logspace() and linspace(), you create parts. that means you break down the range into number of parts.
- In linspace() the gap between the two elements is fixed but in logspace() the case is different.
- The spacing between two elements would be depends upon the log of it
- So let’s see it’s implementation, write the following code.
|
1 2 3 4 5 6 7 |
from numpy import * arr = logspace(1,50,5) print("Result Of logspace() :", arr) |
- logspace() computes its start and end points as base**start and base**stop respectively. The base value can be specified, but is 10.0 by default.
- so here, it will start from 10 rest to 1 to 10 rest to 50 and it will get divided into 5 parts.
- And now lets see the result.

Till this point, we have seen 4 functions and now we have two more. This two more is actually very efficient. The first one is zeros() and second one is ones(). So let’s discuss about them.
zeros()
- So if you want to create an array, let’s say of size 10 and all the values by default should be zero. In that case, you will be using zeros() as a function.
- So let’s see how it works. Write the following code.
|
1 2 3 4 5 6 7 |
from numpy import * arr = zeros(10) print("Result Of zeros() :", arr) |
- It will create a array, size of 10 with all the elements are zero. see the output.

In output, you are getting 0. which means you are getting float values. But if you want to work with integer then you have to specify data type. So see how to do that.
|
1 2 3 4 5 6 7 |
from numpy import * arr = zeros(10,int) print("Result Of zeros() :", arr) |
And the output for this will be –

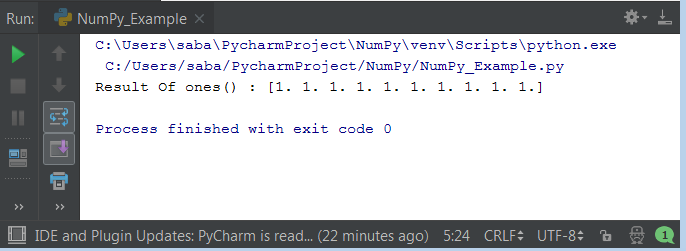
ones()
- It is also same as the zeros() but the difference is that ones() will give you 1 that means all the elements will be 1.
- so let’s write the following code.
Recommended Articles :
- Python Calculator – Create A Simple GUI Calculator Using Tkinter
- Python Chatbot – Build Your Own Chatbot With Python
- Best Python Book For Beginners – Choose A Best Python Book
- Speech Recognition Python – Converting Speech to Text
- Data Visualization Python Tutorial using Matplotlib
So this was all about Python NumPy Tutorial. In the upcoming tutorial, you will learn about advanced topics of NumPy. If you have any doubt regarding this tutorial then please leave your comment. And please share this with others and help them. Thanks Everyone