
Have you wondered how google fetch the data from entire World Wide Web and index it in search engine? It is called scraping which is the process of data extraction from websites in an automatic fashion. Web scraping is an effective way of gathering data from webpages, it has become an effective tool in data science. In Scrapy Python Tutorial, you will learn to scrape web data from websites using scrapy library. So let’s gets started.
There are plenty of tools which you can use for web scraping. Such as HTTrack and WGet, but these tools only helps to download the entire website and not extracting the specific parts of the data. Let’s take an example, if you want to data of any webpage, you won’t be able to extract specific parts of data, you won’t be able to export the data to a database, also you won’t be able to structure the data that means you won’t be able to fully control the data. The only advantage of these tools is that the ability to download only an offline version of a website. Now we are developers, we should build our own tools. So a most robust solution is to use a web crawling framework SCRAPY. So now it’s time to explore scrapy.
Scrapy Python Tutorial – Introduction To Scrapy
What Is Scrapy ?
- It is the number one framework to build your own spider.
- Scrapy is a powerful web framework used for extracting, processing and storing data.
- By using scrapy, you will be able to extract or select specific parts from the webpage using selectors. Like CSS or Xpath selectors.
- It doesn’t only extract data from home page but it extract the data from entire website.
- Scrapy is a free and open-source web crawling framework written in python.
How Scrapy Works ?
So now we will understand how scrapy works.
Engine, spiders, downloader, item pipelines and schedular are the components of scrapy. They work together and perform web scraping. Now let’s see flow of interaction between these components.
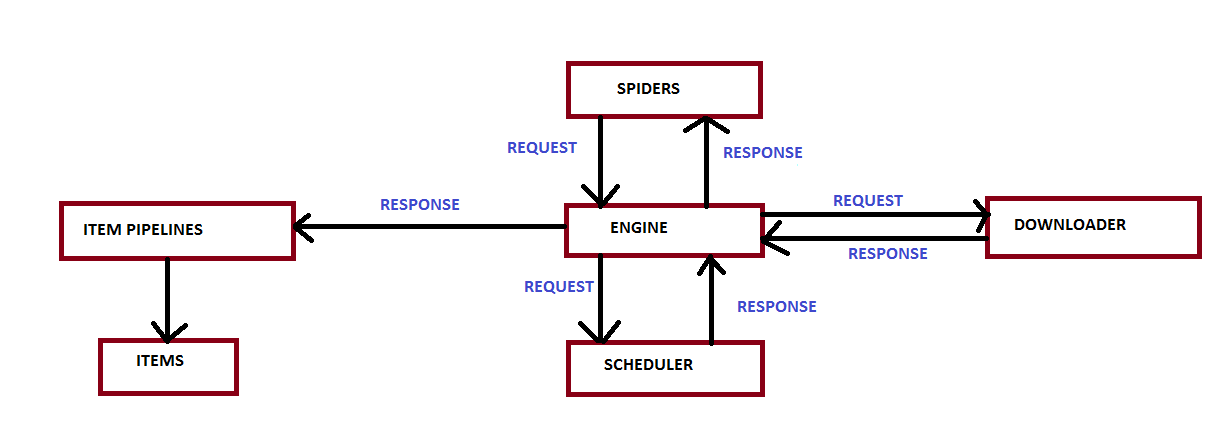
- At first the engine receives an HTTP request sent by the spiders.
- Then the engine delivers this request to the scheduler.
- Now we will understand, why engine delivers this request first to the scheduler not to the other components. The reason behind this is because the scheduler is responsible for tracking the order of requests, who comes first is served first.
- If there is a request which is more prioritized, it returns the same request back to the engine. And the engine takes that request and sends to the downloader to generate a response back to the engine.
- The engine receives that response and sends it to the concerned spider for processing purposes.
- And finally the engine which is the coordinator, sends response to the Item pipeline to return specific parts of the data that you told it to scrap.
- All these happens in a matter of seconds that’s why now-a-days scrapy is getting more and more interests by developers over the time.
Also Check – Parsing HTML in Python using BeautifulSoup4 Tutorial
Scrapy Python Tutorial – Starting First Scrapy Project
In this section, we will learn to installing scrapy module, creating spiders, writing python code and many more. So let’s gets started without delay any time.
Creating Project In PyCharm
Now the first thing you have to do is to create a project. I am using PyCharm IDE so i am creating a project on PyCharm.
Installing Scrapy
Now you have to install scrapy. You can install scrapy by running following command on the command prompt or on the terminal. You can also install scrapy by adding package from project interpreter.
|
1 2 3 |
pip install scrapy |
Scrapy is written in pure python and may depend on a few python packages like:
-
lxml – It is an efficient XML and HTML parser.
-
parcel – An HTML/XML extraction library written on top on lxml
-
W3lib – It is a multi-purpose helper for dealing with URLs and webpage encodings
-
twisted – An asynchronous networking framework
Creating A Scrapy Project
To create a scrapy project, go to your directory and open it on terminal. now run the following command on your terminal.
|
1 2 3 |
scrapy startproject myfirstscrapy |
Here my scrapy project-name is myfirstscrapy. My scrapy project looks like this.
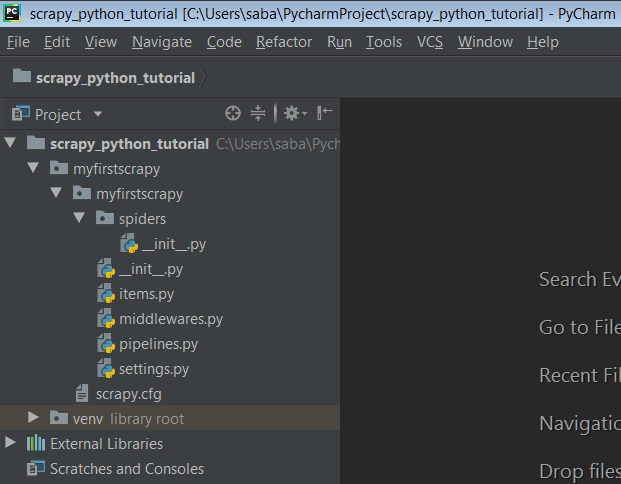
Now we will understand the structure of this project. This contains 5 python files, so let’s know what they mean.
myfirstscrapy/
-
scrapy.cfg – it deploys configuration file
myfirstscrapy /
- __init__.py – Project’s python module, you will import your code from here.
- items.py – project items definition file
-
middlewares.py – project middlewares file
-
pipelines.py – project pipelines file
-
settings.py – project settings file
- scrapy.cfg – it deploys configuration file
spiders/
- __init__.py – a directory where later you will put your spiders
Creating Your First Spider
Spiders are classes that you define and that Scrapy uses to scrape information from a website (or a group of websites). They must subclass scrapy.Spider and define the initial requests to make, optionally how to follow links in the pages, and how to parse the downloaded page content to extract data.
So now create a python file and save it in the myfirstscrapy/spiders directory in your project. And now write the following code in your python file.
|
1 2 3 4 5 6 7 8 9 10 11 12 13 14 15 16 17 18 19 20 21 22 |
import scrapy class SimplifiedSpider(scrapy.Spider): name = "simplified" def start_requests(self): urls = [ 'https://www.simplifiedpython.net/page/2/', 'https://www.simplifiedpython.net/page/3/', ] for url in urls: yield scrapy.Request(url=url, callback=self.parse) def parse(self, response): page = response.url.split("/")[-2] filename = 'page-%s.html' % page with open(filename, 'wb') as f: f.write(response.body) self.log('Saved file %s' % filename) |
- First of all import scrapy module.
- And then create a class for example SimplifiedSpider. And now you have to subclass a scrapy.Spider file here. To use scrapy it is must.
- Now you have to name your scrapy that identifies the Spider. Here i have named it as simplified. It must be unique within a project, that is, you can’t set the same name for different Spiders.
- Then you have to define start_requests() method. Here you have to mention the urls of web-pages or websites over here which you want to scrap. It must return an iterable of Requests (you can return a list of requests or write a generator function) which the Spider will begin to crawl from. Subsequent requests will be generated successively from these initial requests.
- Now define one more function parse() that will be called to handle the response downloaded for each of the requests made. The response parameter is an instance of
TextResponsethat holds the page content and has further helpful methods to handle it. - The parse() method usually parses the response, extracting the scraped data as dicts and also finding new URLs to follow and creating new requests (
Request) from them.
Running The Spider
Now to put your spider to work, go to the project’s top level directory and run the following command.
|
1 2 3 |
scrapy crawl simplified |
Now you can see, two html file has been created. These files contain the html code of the pages that we have scrapped.
Also Check – Scrapping Wikipedia With Python
So guys this was Scrapy Python Tutorial. Now if you have any types of doubts then must ask your queries in comment section. And if you found it helpful then SHARE.