
Welcome to Kivy Button Example Tutorial. In this tutorial, you will learn how to create a button in kivy apps. You will also learn how to style a button, Adding functionalities to buttons and many more. So let’s start this tutorial without wasting time.
But if you have not checked Python Kivy Tutorial For Beginners – Getting Started? Then check it first so that you can easily understand this tutorial.
Contents
Kivy Button Example Tutorial – Getting Started
The Button is a Label with associated actions that are triggered when the button is pressed (or released after a click/touch).
Creating Button
Creating button in kivy is not so difficult. Its very easy and have only few lines of code. so write the following code to create a button in kivy.
|
1 2 3 4 5 6 7 8 9 10 11 12 13 14 |
import kivy from kivy.app import App from kivy.uix.button import Button class FirstButtonApp(App): def build(self): return Button(text="SUBMIT") if __name__ == "__main__": FirstButtonApp().run() |
- First of all you have to import kivy.uix.button module.
- Then you have to create a class where you will create your button.
- Now run the above code, you will get the output something like as below.
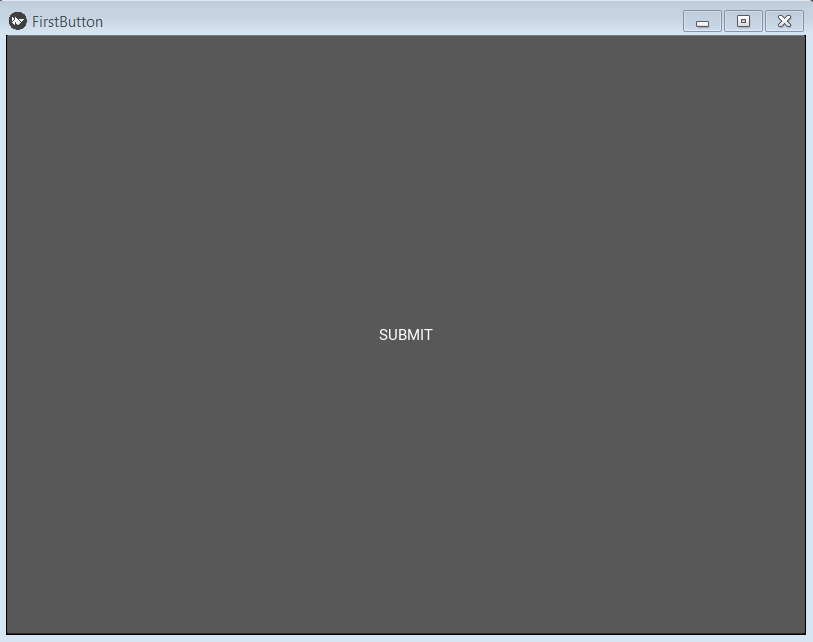
Here, you can see the button size is equal to the window that means button has covered the window. So you need to customize properties of button for better User Interface. So let’s see how can we style our button beautifully.
Styling The Button
Now we will add some style to the button such as font size, color, size etc. So write the following code to this.
|
1 2 3 4 5 6 7 8 9 10 11 12 13 14 15 16 17 18 19 |
import kivy from kivy.app import App from kivy.uix.button import Button class FirstButtonApp(App): def build(self): return Button(text="SUBMIT",font_size ="30sp", background_color =(1, 1, 1, 1), color =(50, 50, 50, 50), size =(15, 15), size_hint =(.2, .2), pos =(400, 250)) if __name__ == "__main__": FirstButtonApp().run() |
- The format of background color is (r, g, b, a).
- Background color is a
ListPropertyand it’s default value is [1, 1, 1, 1]. - This acts as a multiplier to the texture colour. The default texture is grey, so just setting the background color will give a darker result. To set a plain color, set the background normal to
''. - These style properties are just similar to the HTML, CSS effects so you can design it according to your choice or requirement.
Now run the above code and check the output.
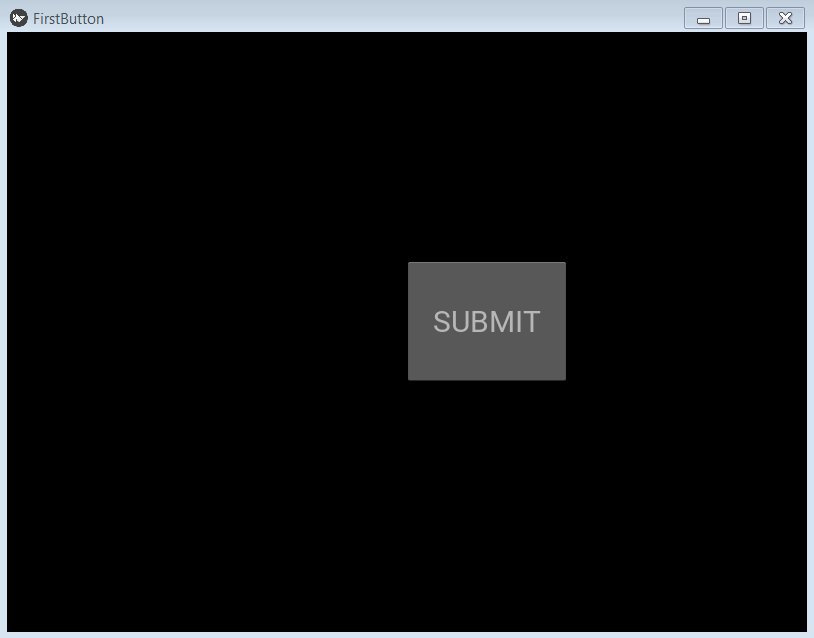
So now our button is affected with style and its looking pretty cool.
Adding Event To The Button
Now we will add function to the button. That means whenever button is clicked, some event will take place.
- bind() method is used to bind event to the button.
- The bind method doesn’t know about the existence of a function or its arguments, it only receives the result of this function call. This often leads to confusion when a user doesn’t understand why the binding is only called once, during the declaration of the binding.
- Inside bind() method we pass on_press because when button press. it tells the function that button is pressed then the bind uses its functionality.
|
1 2 3 4 5 6 7 8 9 10 11 12 13 14 15 16 17 18 19 20 21 22 23 24 25 26 |
import kivy from kivy.app import App from kivy.uix.button import Button class FirstButtonApp(App): def build(self): button = Button(text="Click",font_size ="30sp", background_color =(1,1,1,1), color =(50, 50, 50, 50), size =(15, 15), size_hint =(.2, .2), pos =(400, 250)) # bind() use to bind the button to function click button.bind(on_press = self.click) return button # click function tells when button pressed def click(self, event): print("Button pressed") print('Congratulations !!!!!!!!!!!') if __name__ == "__main__": FirstButtonApp().run() |
Now run the above code and let’s see what happens.
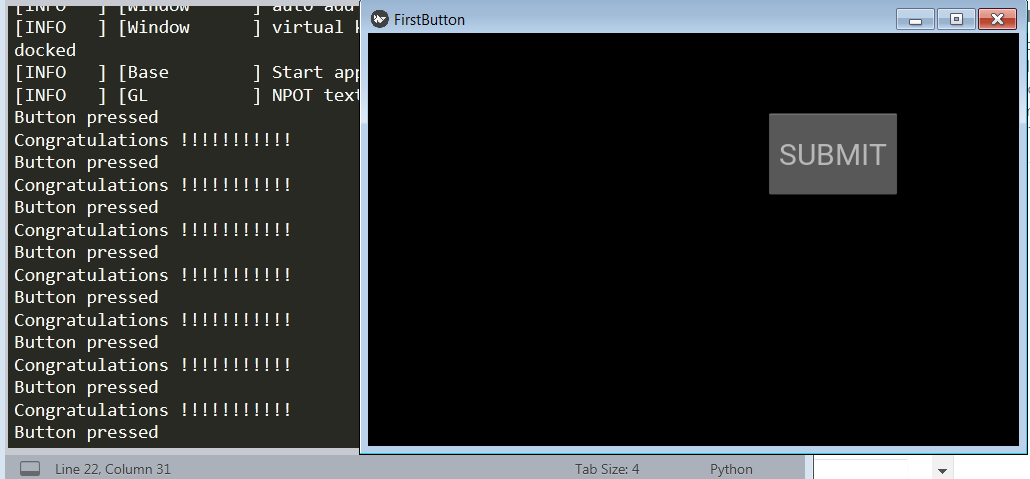
So the output is look like this.
So this was all about Kivy Button Example Tutorial. If you have any problem regarding this post then feel free to comment. And please share this post as much as possible. Thanks.