
Welcome to my new tutorial kv Design Language. In this tutorial, you will learn, how can you design a separate file for your UI of kivy application. So let’s do it.
For Beginners – check them first
Python Kivy Tutorial For Beginners – Getting Started
Kivy Button Example Tutorial – Working With Buttons In Kivy
A Quick Overview Of kv Design Language
There are two ways of developing kivy applications.
- The first one is, you can design your UI inside your main kivy file that means in this method you have to create all your widgets inside build( ) method of your app class.
- The second one is, you can separate your UI design from your main application file, that means you can create a separate file(.kv extension) where you can create all widgets and layouts of your application.
KV Design Language – Getting Started
The main purpose of kv design is to separate style from code.
Rules For Creating a .kv File
To create a kv file, you must have to follow the following considerations:
- File Extension – The file must be saved with .kv extension and as *All Files.
- Naming – The name of .kv file must have following properties:
-> The name of .kv file must match with the name of your main class that means the class which contains build method.
-> You must have to write your .kv file in all lowercase.
-> If the name of your main class ends in “app” (lowercase or uppercase) you must not include “app” in your .kv file name.
3. File location – You must have to save your .kv file inside the same directory where you save the python file.
Loading .kv File To Python Script
You can load .kv file to your python application using two ways :
-
By name convention:
Kivy looks for a Kv file with the same name as your App class in lowercase, minus “App” if it ends with ‘App’ e.g:
If this file defines a Root Widget it will be attached to the App’s root attribute and used as the base of the application widget tree.123MyFirstApp -> MyFirst - Builder : You can tell Kivy to directly load a string or a file. If this string or file defines a root widget, it will be returned by the method:
|
1 2 3 |
Builder.load_file('path/to/file.kv') |
Or
|
1 2 3 |
Builder.load_string(kv_string) |
By Name Convention
Now we will see how to design a kivy app using .kv file. So for achieving this goal you have to do two tasks –
Creating Python File
So now you have to create a .py file and write following code.
|
1 2 3 |
import kivy<br />from kivy.app import App<br />from kivy.uix.button import Button<br /> <br /> <br />class MyFirstKivyApp(App):<br /> def build(self):<br /> return Button()<br /> <br /> <br />if __name__ == "__main__":<br /> MyFirstKivyApp().run() |
Adding Widgets From .kv File
Now create a .kv file and write the following code.
|
1 2 3 4 |
<Button>: text: "Hello Kivy" |
Now run your code and see the result.
Let’s Do An Another Way Of Creating Kivy Applications With .kv File
Creating Python File
Create a python file and write the following code.
|
1 2 3 4 5 6 7 8 9 10 11 12 13 14 15 16 17 18 19 20 |
import kivy from kivy.app import App from kivy.uix.button import Button from kivy.uix.widget import Widget class Mykvwidgets(Widget): pass class MyApp(App): def build(self): return Mykvwidgets() if __name__ == "__main__": MyApp().run() |
- First of all you have to import Widget module.
- Then create an empty class, in my case it is Mykvwidgets to add widgets to our screen using .kv file. This class will simply inherit from Widget and will be what is used from within the kv file to add widgets.
- Then finally you have to make build method of main class to return an instance of class Mykvwidgets.
Creating .kv File
Now create a .kv file and write the following code.
|
1 2 3 4 5 |
<Mykvwidgets>: Button: text: "Submit" |
In .kv file the first thing you have to do is to declare the class(Mykvwidgets) where you are going to add widgets. Then simply define the widgets which you want to add. You can also add some properties to widgets as your requirement.
Note : But while creating .kv file you have to make sure that you have defined indentation properly. Indentation should be four spaces per level.
Builder
To use builder, first you have to import it. So write the following code.
|
1 2 3 |
from kivy.lang import builder |
Loading KV File As A File
If you want to load kv file as a file then write following code.
|
1 2 3 4 5 6 7 8 9 10 11 12 13 14 15 16 17 |
import kivy from kivy.app import App from kivy.lang import Builder kv_as_a_file = Builder.load_file("my.kv") class MyApp(App): def build(self): return kv_as_a_file if __name__ == "__main__": MyApp().run() |
And in my.kv file write the following code.
|
1 2 3 4 |
Button: text: "Submit" |
Now run the application and check your output.
Loading KV File As A String
Now to load kv file as a string then write following code.
|
1 2 3 4 5 6 7 8 9 10 11 12 13 14 15 16 17 18 19 20 21 22 23 |
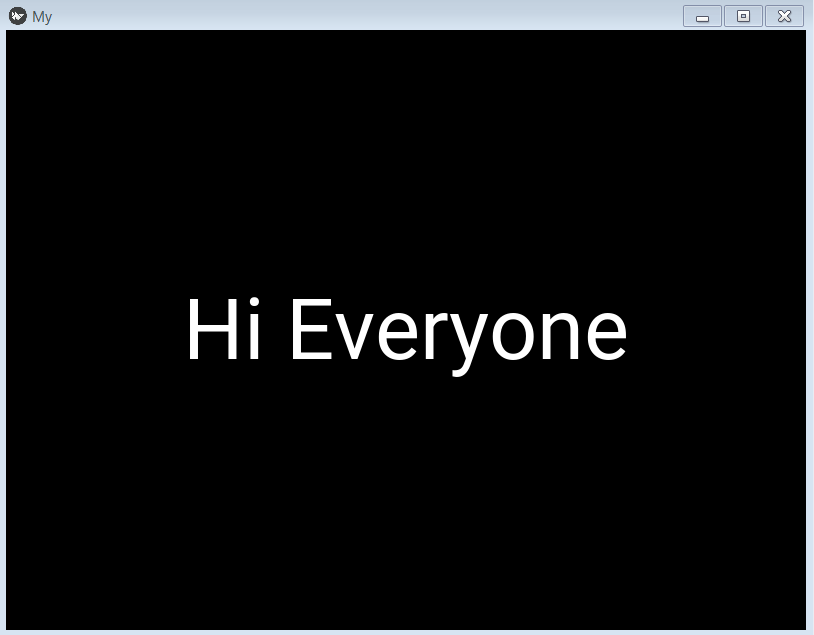
import kivy from kivy.app import App from kivy.lang import Builder #from kivy.uix.button import Button kv_as_a_string = Builder.load_string(""" Label: text: "Hi Everyone" font_size: '64pt' """) class MyApp(App): def build(self): return kv_as_a_string if __name__ == "__main__": MyApp().run() |
Now run the code, you will get following output.
So this was all about KV Design Language tutorial. If you have any problem regarding this post then feel free to comment. And please share this post as much as possible. Thanks.